
Step-by-step Instructions for Setting up User ID Tracking in Google Tag Manager
Analysts rely heavily on Google Analytics (GA4) to make data-driven decisions, which are contingent on data accuracy. Despite the usefulness of GA’s default reports, there are many caveats to keep in mind when analyzing analytics data—especially for larger sites. For example, sampled data in GA4 reports provide results based on a representative sample of traffic for the date range selected. When you analyze data more granularly with a secondary dimension in a segmented report (by device type in an Organic Traffic report), data is limited further to results for a percentage of that percentage. In other words, the closer you get to individual user data, the more sampled your data becomes.
💡 With the migration over to GA4, you may be wondering what the key differences are between GA4 and Universal Analytics– we have you covered in this blog post if you need a bit of a refresher.
Google Analytics 4 is great for holistic representations of your audience but not necessarily for detailed insights into individual user behavior on your site. Despite the availability of the Path Exploration, Cross-Device, and Lifetime Value reports in the basic GA view, even the count of users needs to be more accurately reported in default reports. Enabling User ID tracking allows you to track users outside of Google’s limitations—allowing for more accurate user metrics, the ability to analyze logged-in vs. logged-out user behavior, and access to more reliable cross-device and lifetime value reports.
This post will explain how data collection works between User ID tracking and your default GA reports, introduce the benefits of tracking user engagement, and provide step-by-step instructions for setting up User ID tracking in Google Tag Manager.
What is the Benefit of Using User ID in Google Analytics?
Using GA4 User ID tracking offers several benefits including:
Cross-Device Tracking: With User ID tracking, you can track users across multiple devices they use to interact with your website or application. This helps in understanding the complete user journey regardless of their device.
User-Centric Analytics: User ID tracking allows you to analyze user behavior on a more individual level rather than just session-based data. This enables you to gain insights into specific users' interactions, preferences, and conversion paths.
Personalized Marketing: By understanding individual users' behavior and preferences, you can tailor your marketing efforts to be more personalized. This could include sending targeted emails, customizing website content, or serving personalized ads based on user interests.
Enhanced User Segmentation: With User ID tracking, you can create more granular user segments based on specific criteria such as demographics, behavior, or engagement level. This helps in better understanding different user groups and targeting them effectively.
Improved ROI Tracking: By attributing actions and conversions to individual users rather than just sessions, you can get a clearer picture of the ROI (Return on Investment) for your marketing campaigns. This enables you to optimize your marketing efforts more effectively.
Long-term Analysis: User ID tracking allows you to track users over longer periods, providing insights into user retention, lifetime value, and repeat purchases. This long-term analysis can help identify trends and patterns that can inform strategic decisions.
Data Accuracy: User ID tracking helps reduce data duplication and inaccuracies that may occur when relying solely on cookies or device identifiers. This leads to more accurate and reliable analytics data.
- Compliance with Privacy Regulations: User ID tracking can be implemented in a privacy-compliant manner, ensuring that user data is handled responsibly and in accordance with regulations such as GDPR (General Data Protection Regulation) or CCPA (California Consumer Privacy Act).
- If you’re not aware yet, Google Consent Mode is on the rise demonstrating the need to continue to approach data and analytics in a privacy-compliant manner.
How to Set Up User ID Tracking
To set up User ID tracking, a site must have GA4 and Google Tag Manager installed, and an authentication system. In most cases, the authentication system is login credentials for returning customers.
Every page should have the following two codes, in this order:
dataLayer script: This will populate with the User ID for your GTM container to grab. The dataLayer script will look like this in the page source when populated: userID': '12483'}]; Work with a developer to have the number in the script above populate with a unique User ID whenever a user logs in to the site. Usually, a unique number can be pulled from login credentials.
- GTM container: Placed after the dataLayer script.
GA4 Tag with user_id parameter: The GA4 tag must be fired through your GTM container for this guide.
How to Set up User ID Tracking with Google Tag Manager
Using GTM is the easiest way to set up User ID tracking. User IDs can be captured through either a cookie or dataLayer variable in GTM. This guide focuses solely on the dataLayer method because it doesn’t require pre-established cookies.
Enable User ID feature: First, ensure that the User ID feature is enabled in your GA4 property settings. To do this:
Go to your Google Analytics account.
Navigate to the Admin section.
In the Property column, click on "Data Streams" under the appropriate property.
Click on the data stream for which you want to enable User ID tracking.
Under "Additional settings", toggle the switch next to "User-ID" to enable it.
After ensuring the dataLayer script and GTM container exist on every page of the site, create the dataLayer variable and modify your GA4 tag in your GTM container.
First, create a new dataLayer variable and configure it to collect data from the dataLayer script by assigning the name “userID” (or whatever name was set in your dataLayer, highlighted above).
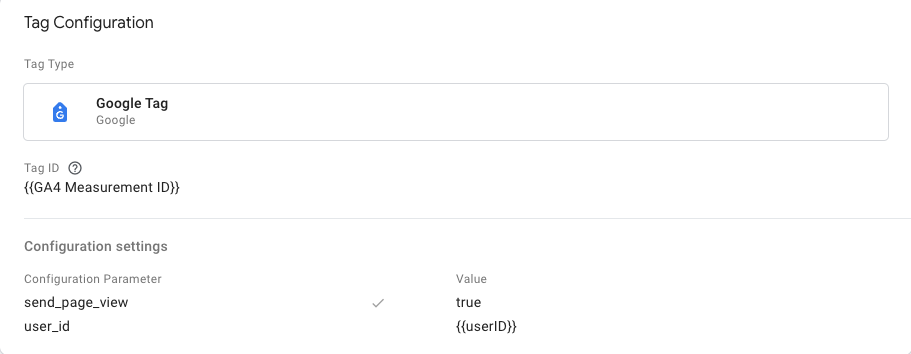
Once you have your userID dataLayer variable, you can configure your GA4 tag to include the user_id parameter which is set to the userID variable.
After you’ve taken these steps, you will be able to leverage the User ID in GA4. You can generate a User ID exploration in GA4 by using the App-instance ID dimension (Note: App-instance IDs will also contain auto-generated GA client IDs which can be denoted by a “.” in the ID value).
You will only be able to view User IDs in the exploration of your reporting identity is set to “observed” or “blended”. There will also be a new dimension available to segment your data called “Signed in with user ID” which will have a yes/no value. You’ll need to collect data for quite a while before having actionable insights for device engagement strategies or customer lifetime value. This is a tactic for long-run optimization strategies, and it’s well worth the time and effort required for setup.
Curious to discover how tracking individual user data can benefit your site? Contact us today to get a free consultation.
This blog post was originally published on April 18, 2016, and was updated and republished on March 14, 2024.