
As analysts, we often find ourselves spending nearly as much time collecting data as we do actually analyzing it. Default reports in Google Analytics 4 don’t always let us compare the right metrics against each other easily. So we gather, combine, and sort through data in spreadsheets to provide insights made from reliable, relative information.
Avoid these inefficiencies by learning what custom dimensions are and how to set them up through Google Tag Manager.
Skip to How to Set Up a Custom Dimension
What is a Custom Dimension?
Non-standard data can be pulled into your GA reports and synced up with metrics through whichever scope type is specified (and feasible). This may sound familiar to you; do secondary dimensions ring a bell?
Custom dimensions are essentially custom secondary dimensions that are configured through your GA settings. There’s a section within secondary dimensions solely dedicated to custom dimensions, once enabled.
Custom dimensions allow you to view additional data points or pieces of information alongside GA's default hits. For example, you could view the author of a blog post next to every hit associated with that blog or stitch together individual user behavior by sending User IDs along with every hit sent by that user. Additionally, even default hits are not available for viewing in every GA report but can be through custom dimensions.
Custom dimensions are boundless, allowing you to pull any piece of information found on a page, in the page source, in a dataLayer, URL, or GTM variable into your Google Analytics reports.
Custom dimensions are made up of the following elements:
Values: the specified data that’s sent
Scopes: the type of value that’s collected
Variables: what collects your value in GTM
Before covering how to configure custom dimensions through Google Tag Manager, we’ll cover what scopes are and how to select the correct type. Choosing the proper scope type is vital to having your custom dimension data properly attributed to hits in your GA reports.
Custom Dimension Scope Types
There are 3 scope types you can specify for custom dimensions; all of which will provide varying levels of depth in your reports. The following scopes are listed in order of lowest to highest number of values sent.
Item Scope (Previously Product Scope in UA)
The item level scope is for eCommerce tracking. This type of tracking only assigns a value to a specific item. It can pull in a value associated with that item when you’re looking at a specific pageview or transaction but it won’t tie this item’s specific value to the rest of the hits in your session.
The benefit this provides is the ability to look at your item-related data in nearly any GA report without having to stay within your Product Report or set up custom events.
Event Scope (Previously Hit Scope in UA)
The event level value is only applied to the specified event. No event before or after this specified event will have this custom dimension associated with it—even within the same session.
For example, you could set up an event-level scope to send a value of “Yes” or “No” for the dimension “Comment Left” to see which posts have received comments within your GA reports. This value would be sent for just a view or entrance of that blog post page and none before or after the same session. Although you could set it up to be a session-level scope, it wouldn’t be useful to view this sort of isolated data along with every hit in the session.
User Scope
User scope is the highest scope level you can set for a custom dimension. So setting this scope will send the most values tied to successive hits to GA—only if it’s a feasible scope to apply to the values you are attempting to pull into your reports.
In a user-level scope, all events in a session during which a specified event occurs, and all events in every session afterward, will be associated with the same value. In the example below, the action that triggers the value didn’t occur in Session 1; therefore, no values are tied to any hits in Session 1. However, the value is triggered to send some time in Session 2, so all events in Session 2, Session 3, and thereafter are tied to the sent value.
The prime example of this is User ID tracking. If User ID tracking is set up on a site with a custom dimension applied at a user scope level, once the user logs into the site, every event in every session afterward will have their User ID tied to it. If you set up User ID tracking as a custom dimension at an event level, you would only get the User ID value tied to the first hit that occurred with the user logged into the site—resulting in the missed opportunity for stitched session reports.
How to Set Up a Custom Dimension
Setting up custom dimensions in Google Tag Manager is much easier to do than it is to understand how it works. It’s actually quite simple if you already have variables and custom tracking set up in GTM.
Steps to setting up a custom dimension through Google Tag Manager:
1. Create an event-scoped custom dimension in GA.
Create your user-defined variable in GTM. Skip this step if you have already created your custom variables. This step will vary depending on the type of variable
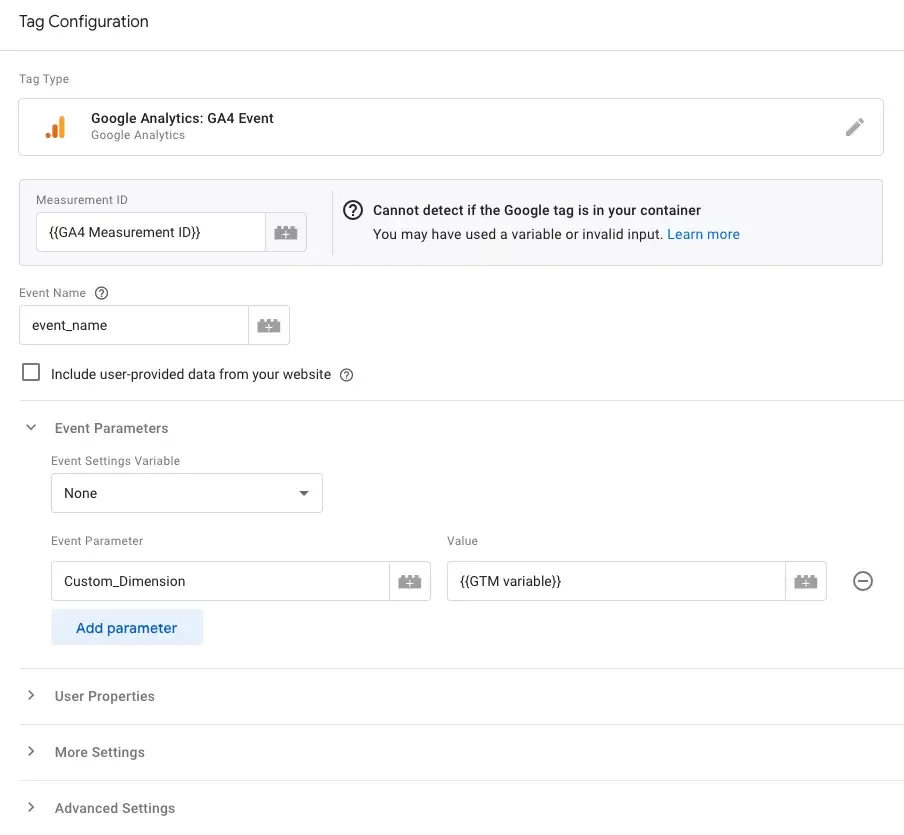
Set the field name and value in your GA variable. Your Google Analytics property must be tracked through a G-tag in GTM to set up custom dimensions with this method. Expand the ‘Event Parameters’ field in your existing GA4 event tag in GTM and set your ‘Event Parameter’ then set the ‘Value’ field as the variable you are using to push values to GA.
Add the event parameter as a custom dimension. Go to ‘Custom Dimensions’ under Admin > Property Settings > Data Display > Custom Definitions. Once on the Custom Definitions page, ensure you are on the Custom dimensions tab then click ‘Create custom dimension’. Input a name, select ‘Event’ for the Scope then select the corresponding Event Parameter from the dropdown.
Using the custom dimension in GA4. After the initial 24-48 hour processing period, you will be able to use the new custom dimension in standard reports, explorations, and audience building.
2. Create a user-scoped custom dimension in GA.
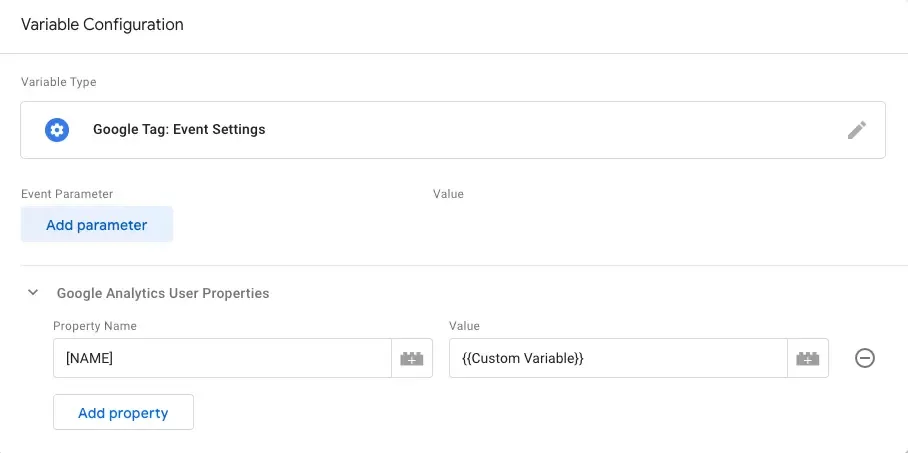
Create an Event Settings variable for your Google Tag. In GTM, you can create an Event Settings variable with associated user-scoped data to use with your base GA4 tag. When creating your Event Setting variable, expand the User Properties section and add your ‘Property Name’ along with the corresponding user-defined variable as the value.
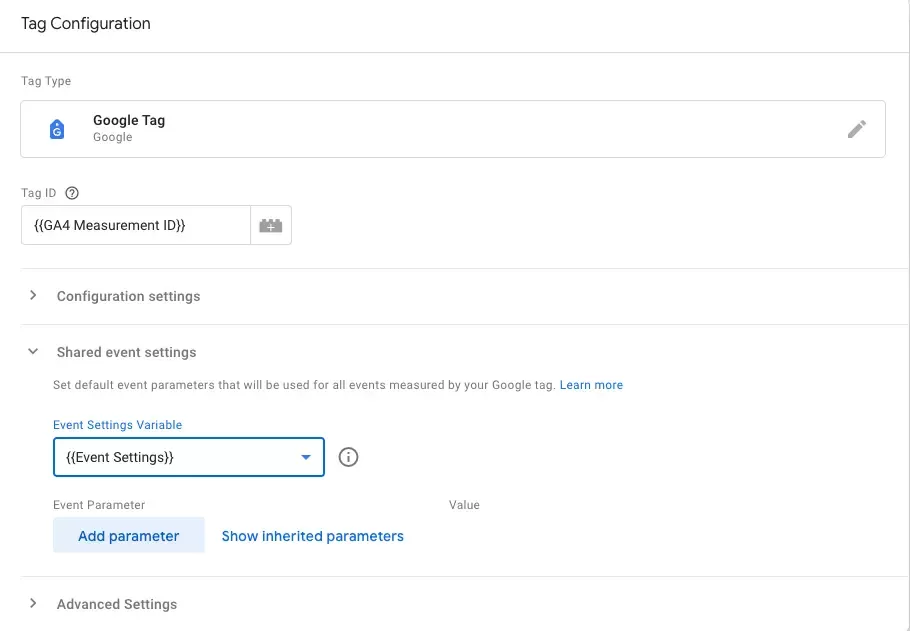
Add the Event Settings variable to the base GA4 Tag. Once you have created your Event Settings variable, go to your base GA4 tag and expand the ‘Shared event settings’ to select the Event Settings variable you created.
Add the event parameter as a custom dimension. Go to ‘Custom Dimensions’ under Admin > Property Settings > Data Display > Custom Definitions. Once on the Custom Definitions page, ensure you are on the Custom dimensions tab then click ‘Create custom dimension’. Input a name, select ‘User’ for the Scope then select the corresponding Event Parameter from the dropdown.
Using the custom dimension in GA4. After the initial 24-48 hour processing period, you will be able to use the new custom dimension in standard reports, explorations, and audience building.
3. Create an item-scoped custom dimension in GA.
Item-scoped custom dimensions are unique from event-scoped and user-scoped events in that the item-scoped events must be passed through the ecommerce object within the items array (schema here). Item-scoped dimensions will not be tied to a specific item if you try to pass those values through the event parameter as shown in the event-scoped custom dimensions.
Add the event parameter as a custom dimension. Go to ‘Custom Dimensions’ under Admin > Property Settings > Data Display > Custom Definitions. Once on the Custom Definitions page, ensure you are on the Custom dimensions tab then click ‘Create custom dimension’. Input a name, select Item for the Scope then select the corresponding Event Parameter from the dropdown.
Access the custom dimension metrics. Once the item-scoped dimension has been added, you can access it by creating an exploration and importing the custom dimension into the exploration.
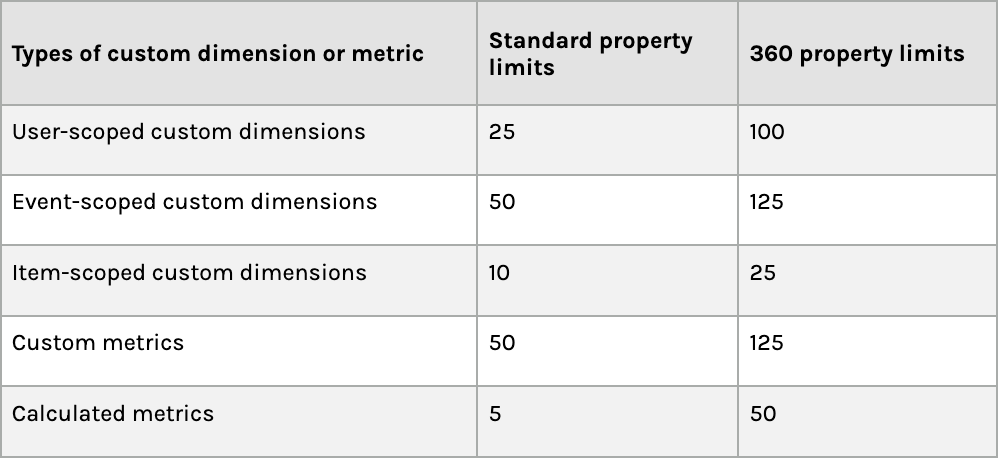
Limits for Custom Dimension and Custom Metrics
Closing Thoughts
As GA4 has moved to an event-based mode from the session-based model of UA, custom dimensions have become a fundamental component of your Google Analytics configuration. If you have any events on your site that send event parameters, you will need a corresponding custom dimension to utilize those values in your reporting and segmentation.
If you need help with your Analytics configuration, contact us today for a free assessment of your Google Analytics account.
This blog post was originally published on August 14, 2019, and was updated and republished on April 29, 2024.